Moja prva igrica
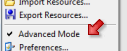
Zaženemo Game Maker in poskrbimo, da deluje v Simple mode. To preverimo tako, da kliknemo na meni File in preverimo ali je slučajno pred Advanced Mode kljukica, če je ni program deluje v Simple mode.
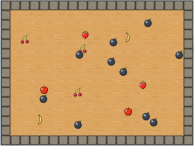
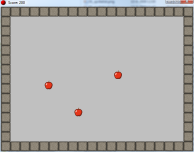
V igrici katero bomo ustvarili bo naša naloga ujeti sadje, ki se bo prosto gibalo po sobi. Sadje bomo pobrali tako, da bomo nanj kliknili. Za vsako pobrano sadje bomo dobili ustrezne točke. Za hitrejše sadje dobimo več točk kot za počasno. Pri tem nas ovirajo bombe, ki ležijo vsepovsod. Izgled igrice vidite na spodnji sliki.
Dodajanje sličic - SPRITES
V igrici bomo potrebovali sličice za ZID, SADJE in BOMBO. Take sličice v programu imenujemo sprites. tako je prvi korak dodajanje teh sličic. Za dodajanje sličice kliknemo na meni Resources in izberemo Create Sprite ali kliknemo na gumbek s simbolom "Pacmana":
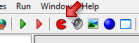
A rather empty form will appear. In this form, press the button Load Sprite.
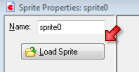
In the file selector that appears open the folder Tutorial1 and in there double click
on the image wall.png. (If you do not see the folder Tutorial1 you should
navigate in the file selector to the folder where Game Maker was installed. There you
find a folder Sprites and in it you find the Tutorial1 folder with the sprites.)
The sprite form should now show the wall block image. You might want to give the sprite an appropriate
name, e.g. spr_wall.
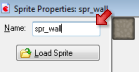
Now press the OK button to close the form. At the left of the Game Maker window you should
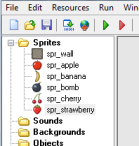
now see the sprite you just added. In the same way add sprites for the apple, banana, bomb, cherry, and
strawberry and give them appropriate names. The list at the left of the window should now look as follows:
Before continuing you might want to save your work. Click on the File menu, press Save, and
select an appropriate location and file name. Note that the file will get the extension .gmk. All
files created with Game Maker will have that extension.
Creating Objects
Sprites are just images. They don't do anything. But objects in your game must
perform actions. They must move around, react to mouse clicks, etc. So the next
step is create some objects. We will start with the wall object.
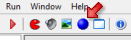
To add an object click on the Resources menu and press Create Object
or click on the button with the blue ball.
The form that appears might look a bit
complicated but don't worry. It will soon become clear.
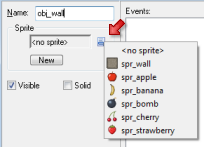
We first give the object an appropriate name obj_wall. Next,
to give it the appropriate sprite, click on the menu icon to the right of <no sprite>
and from the menu that appears select the wall sprite:
The wall object must be solid cause we do not want the fruit to move through it. To this end,
press the checkbox Solid to select it. As the wall needs no further behavior, press the OK
button to close the form. The wall object should now have appeared in the list at the left. Better
save your work before continuing.
The Apple Object
We are now going to create the apple object. Again press the button on the toolbar
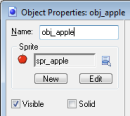
with the blue ball, to create a new object. Give the object as a name obj_apple
and select the apple sprite for it. The apple is not solid. So the form should look as follows:
Our apple object will need some behavior. First of all it must move around. And secondly
it must react to mouse clicks. In Game Maker behavior is defined as follows: Objects
get events. An event happens when for example the object is created, when it collides with another
object, and when the user presses the mouse button or a key on the keyboard. You can indicate that
the object should react to certain events by executing actions. For example when the create event
happen we can execute an action to start moving.
In the object form, in the middle there is the list of events (empty at the moment). To the right
of this there is the list of actions to be executed for the selected event. And at the far right there
are six tabbed pages with all the different actions you can use.
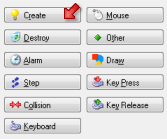
Our first step is to make sure the apple starts moving when it is created. Press the button Add Event.
A form appears in which you select the Create event:
The event is added to the list. We can now include actions in this event by dragging them into the action
list. Press and hold the mouse on the top-left action with the eight red arrow, drag it into the action list and
release the mouse button. A form will appear in which you can indicate the directions of motion and the speed. Press
all eight arrows to indicate the apple can move in any of these directions. As a speed, type in 8. Finally press
OK.
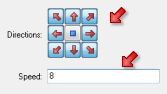
We have now indicated that the apple, when it is created, should move in any of the eight directions with a speed
of 8. Next we must make sure it bounces against the walls. For this we need a collision event.
This happens when two objects collide with each other.
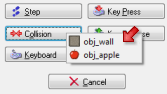
Press the button Add Event and in the form click on Collision. In the menu that appears select the
wall object.
The event is added to the list. Make sure it is selected. Now click the bounce action (the bottom right one) and
drag it into the action list. In the form that appears simply press the OK button.

Our final step is to make sure the player can press the mouse on the apple. In this case we want to
move the apple to a random location (to make it harder for the user to press on it again) and we
want to give the player some score.
Again press the Add Event button and in the form click on Mouse. In the menu select
Left pressed. This event happens when the player presses the left mouse button on the object.
Drag the Jump to Random action to the list. (You can see the name of an action by letting the
mouse hover over the button).

In the form that appears simply press the OK button. This will make the apple jump to a
random location. Next we need to give the player some score. At the right of the form, select the
tabbed page labeled score. A new set of actions appears. Drag the top-left Set Score action to
the action list.
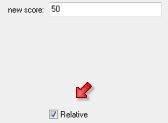
In the form indicate a new score of 50. Now we do not want to set the score to 50 but
we want to add 50 to the score. To this end click on the checkbox Relative.
This concludes the definition of the apple. The event and action list should now look as follows.
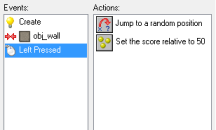
Press OK to close the object form. We now defined our two important objects: the wall and the
apple, which are now both shown in the list at the left. Better save your work.
Creating a Room
Now that we have defined our wall and apple, we need to create a room in which to put them.
Rooms are what the player sees when he/she plays the game. Our game will need just one room
but games made with Game Maker can have many different rooms. To create a room, click
on the Resources menu and press Create Room
or click on the corresponding button on the toolbar:
The room form will appear. At the left there are three tabbed pages: objects, settings, backgrounds.
Make sure objects is selected. At the right there is an empty area that is the actual room. If your
screen is large enough, better scale the form such that the whole room is visible.
We can now add objects to the room. At the bottom left, click on the menu icon and in the popup menu
select the wall object:
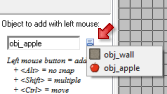
Now click with the left mouse button in the top left of the room area. An instance of the wall object
should appear. Continue adding wall objects until you create a complete boundary around the room. If
you make a mistake you can use the right mouse button to delete instances.
(If you want to do this faster, in the toolbar set the values of Snap X and Snap Y to 32, the
size of the sprites, now you can draw multiple wall sprites by holding the <Shift> key.)
Next we want to add some apples. Again click on the menu icon and in the popup menu
select the apple object. Place two or three apple objects at random places in the room.
That finishes the game. Press the green checkmark sign in the toolbar of the room form to close it.
Testing the Game
Now it is time to test the game. Better save the game first. Click on the Run menu and press
Run normally or press the green run button in the toolbar.
If you followed the previous steps correctly the Game Maker window disappears and
a window shows in which the apples move around. If they
hit the wall they should bounce back. And if you manage to click with your mouse on one of the apples,
you should see the score in the window caption increase and the apple jumps somewhere else.
Better check the game carefully. Do the apples move in different directions? If not you probably did not
create the correct Create event. Do they bounce of the walls? If not, you probably either did not
make the walls solid or you did not create the correct Collision event. Can you click on them with
the mouse and do you get some additional score? If not you must have made an error in the Mouse press
event.
You can switch the game to fullscreen mode by pressing F4. Press Esc to end the game and return the Game Maker.
Adding a Background
Assuming your game did work as expected, we are now going to make it look a bit fancier.
First we will add a wooden background image. Click on the
Resources menu and press Create Background
or click on the button with the image:
In the form that appears, give the background an appropriate name and press the Load Background
button.
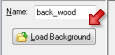
In the file selector that appears open the folder Tutorial1 and in there double click
on the image wood.gif. If you do not see the folder Tutorial1 you should
navigate to the folder where Game Maker was installed. There you
find a folder Backgrounds and in it you find the Tutorial1 folder with the background.
Press OK to close the form. The background should now be visible in the list at the left. The next
step is to make the background visible in the room we already created. To reopen the form for the room, double
click on it in the list at the left. (Don't add a new room!)
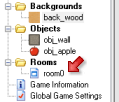
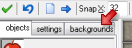
In the form, click on the tab backgrounds to open that page.
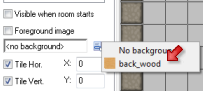
In the middle click on the menu icon, next to where it says <no background> and select the wooden background.
The background should now be visibile in the room at the right.
(Note that there are many options you can set about backgrounds in rooms but we don't need them here.
You can find more information about this in the help file.) Press the green checkmark at the top left
to close the room form. Now better save the game and run it to see whether the background is shown
correctly.
Adding a Sound
Next we add a sound effect to the game. This effect must
play when the player clicks on an apple. Click on the
Resources menu and press Create Sound
or click on the button with the image of a speaker:
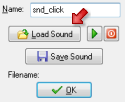
In the form that appears, give the sound an appropriate name and press the Load Sound
button.
In the file selector that appears open the folder Tutorial1 and in there double click
on the sound file click.wav. If you do not see the folder Tutorial1 you should
navigate to the folder where Game Maker was installed. There you
find a folder Sounds and in it you find the Tutorial1 folder with the sound.
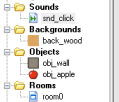
Press OK to close the form. The sound should now be visible in the list at the left. We now need to
make sure the sound is played when the player clicks on an apple. Reopen the apple object by double clicking
on it in the list at the left.
Select the Left Pressed event, by clicking on it in the list of events. In the list
of actions you will now see the jump and score actions. At the right of the form, select the tabbed page labeled
main1. A new set of actions appears. Drag the action with the speaker on it to the list of actions to play
a sound.

In the form that appears, select as a sound the click sound (click with
the mouse on the top menu icon to select the sound). Make
sure to keep the value of loop to false as we want the sound to play only once. Next press the OK
button. The action list should now look as follows:
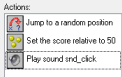
Again press OK to close the object form. Save and play the game, and now the sound should
play whenever you click on an apple.
Adding Music
To improve the atmosphere we are going to add background music to the game. Click again on the button
to add a sound. In the form give the sound an appropriate name and press the Load Sound button.
You should still be in the folder with
the sounds for the tutorial. Select the file music.mid. This is a midi file. These are
useful as background music as they are rather small. Many can be found on the internet.
Press OK to close the sound form.
Now we need to make sure that the sound will play at the beginning of the game and loop forever. We are
going to use an additional object for it. Press the button with the blue ball to add a new object and
give it an appropriate name. It does not need a sprite. Click on the Add Event button and select the
Create event. At the right side select the page main1 and drag the Play Sound action
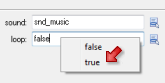
into the action list. (You should by now know how this works.) As a sound select the music and set loop
to true. So the music will now play forever after the object is created.
Press OK to close the action form and again press OK to close the object form. We still need
to add the object to the room, otherwise it won't be created. In the list at the left double click on the room to
open its form. Make sure the objects page is visible at the left.
Click on the menu icon in the middle to select the music object. Now click somewhere in the room to add an instance
of the object. The object has no sprite so a little blue ball with a question mark is shown instead:
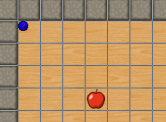
Be careful to only add one instance of the music object. Press the green checkbox
to close the room form. Save the game and run it. You should now hear background music.
More Fruit
Let us now add some variation to the game by including other types of fruit. Because the steps are
the same as before we only describe the global details. The sprites for the fruits are
already there so we don't need to add them anymore.
Add a new object (click the blue ball). Give it an appropriate name and give it the banana sprite. This
one is going to be a bit more difficult to click on. Add the Create event and in it add the action to
move in a fixed direction. Only select the diagonal arrows and give it a speed of 12.
Add a Collision event with the wall object and it in add the action to bounce, just as before. Next add the
Mouse event for Left pressed. In it add the action to let the object jump to a random position.
Add the action to set the score (from the score tab) with a value of 100 (this is a more difficult fruit
so you should get a higher score), and don't forget to click the Relative box to add the value to the score.
Finally add the action to play a sound (from the main1 tab) and play the click sound.
In the same way add an object for the cherry and for the strawberry. You can give them different speeds and corresponding
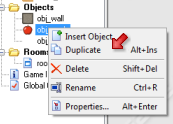
higher or lower scores. If you find this all a lot of work, you can also right-click on an existing object and select
Duplicate. This creates a copy of the object. You can now change the name and sprite, and
change the values for the different actions (by double clicking on them).
Now reopen the room (double click on it in the list) and add a few instances of the different fruits. You might need to remove some apples to
make room. Remember that you can use the right mouse button to remove instances.
Save and play the game. Test it all carefully.
Make sure that you indeed get a score that corresponds with the difficulty of the fruit.
Adding Bombs
Although the game can already be fun to play, there is something missing. You cannot lose!
You can just keep clicking randomly, which is not really much fun. Hence, we are going to add
bombs to the game. If you click on a bomb you will lose and the game will end. Bombs will be static.
They won't move, but their number keeps increasing to make the game more and more difficult over time.
The bomb sprite is already present but we atill need a sound effect for it. Press the button with the
speaker to add a sound. Give is an appropriate name, press the Load Sound button and select
explosion.wav. Press OK to close the sound form.
Now create the bomb object by clicking on the
blue ball button. Give the object an appropriate name and the bomb sprite. We want the bomb to
appear in a random place. To this end, add the Create event. In it place the action to jump
to a random location.
When the use clicks on it we want the game to end. So add the Mouse event Left pressed.
As a first action we want to play the explode sound so add the play sound action (from the main1 tab)
and select the explode sound. Next we want to wait a little while to let the player realize he lost.
From the main2 tab, drag the sleep action (with the zzz on it) and place it below the play sound
action. The default values are fine, so press OK.
As a next step we want to show a highscore list. This is very easy in Game Maker. From the score
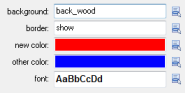
tab, drag the show highscore action (with the 1,2,3 in it). In the form you can set quite some values. As
a background you can choose the wood background. You also can change the colors and the font if you like, for
example as follows:
As a final step we need the action to restart the game, which can be found in the main2 tab. The action
list should now look as follows:
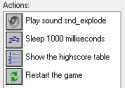
Make sure the order of the actions is correct. (If not, drag them to the correct location.)
That finishes the bomb object so better press the OK button to close the form.
To test the game, place one or two bomb objects in the room. Save the game, run it, catch some
fruit and then click on a bomb. An explosion sound should be heard and the highscore list should show.
Note that in this list you can add your name if you get a new high score.
Creating Bombs
To make the game more difficult we want to create additional bombs while playing the game.
We can create a new object to do this but we can as well use the music object for this. So
reopen the music object by double clicking on it in the list at the left.
To create the bombs we will use alarm clocks. You can set these clocks to a particular value and
they will then tick down to 0. Once they reach 0 an Alarm event will happen. To initialize
the alarm clock, go to then main2 tab and drag the top left action (with the clock image)
to the action list (below the play sound action). As number of steps indicate a value of 60.
A second is 30 steps so we will add a new bomb every 2 seconds. Make sure alarm 0 is selected.
Now press Add Event, click on the Alarm events and select in the menu Alarm 0.
In this event we will create the bomb. Go to the main1 tab and drag the top left action in the
action list (the lightbulb). Click on the menu icon and select the bomb object.
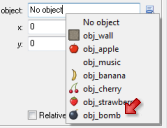
There is no need to set a position as the bomb will anyway jump to a random position. Next we must set the
alarm clock again. So add the alarm action (from the main2 tab) and set alarm 0 again to 60. This
will repeat the proces. So the action list now looks as follows:
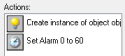
Close the object form, save the game, and run it. You should see more and more bombs appearing and eventually
you will click on one of them and the game will end. If you want to make the game a bit harder, you can also
let the bombs move slowly. You should by now know how to achieve that.
Giving Help
Even though you know how to play the game, somebody else might not. So you should provide some
help for the player. This is very easy in Game Maker. Double click on the Game Information
at the bottom of the list at the left.
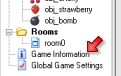
A simple editor will appear. Here you can type a little help text. Give your game a name and describe what the
goal is. You can choose different fonts, colors, and styles. Once you are ready, press the green checkmark at the
top left to close the form.
Now when you run the game and press F1, the help text will appear. Escape will return you to the game.
Congratulations
You have now finished your first game. As you saw, it was not very difficult. You game should look
something like this:
If it did not really work correctly, you can always load the game from the Examples folder. Once the game
is ready you might want to give it to your friends. But they might not have Game Maker. To this end
go to the File menu and click on Create Executable. Indicate the name (and location)
and press Save. You will now have a stand-alone game that you can give to everybody to play.
You have learned about the most important elements of Game Maker: sprites, backgrounds, sounds, music,
objects, events, actions, and rooms. You should now be able to start making your own games. But there is a
lot more to learn. You can check the help file or you can read some more tutorials. And there even are
books about Game Maker. You can access all this information through the Help menu. Enjoy!